Introduction: Moving your blog from Blogger to WordPress is a great decision to unlock more customization and advanced features. While the process might seem challenging, this step-by-step guide will make it easy for you to transfer your blog smoothly.
Step 1: Backup Your Blogger Blog
Before making any changes, it’s crucial to back up your Blogger blog to avoid losing any content.
Log in to Blogger Dashboard: Access your Blogger account.
Export Content:
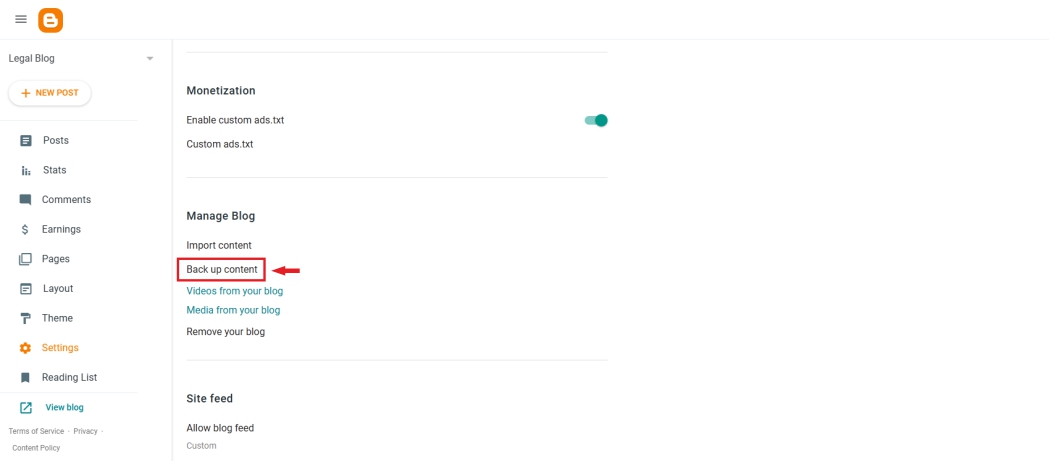
Navigate to Settings > Manage Blog > Backup Content.
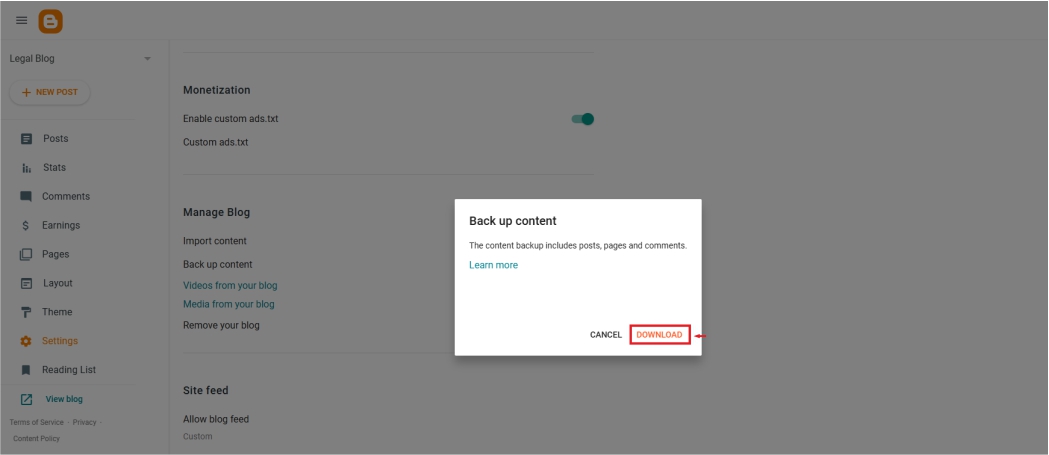
Click Download to save a .xml file of your blog on your computer.
This file contains all your posts, pages, and comments, ensuring that your content is safe during the transfer.
Step 2: Import Blogger Content to WordPress
Once you’ve backed up your Blogger content, it’s time to import it into WordPress.
Log in to the WordPress Admin Panel: Access your WordPress dashboard.
Install the Blogger Importer Tool:
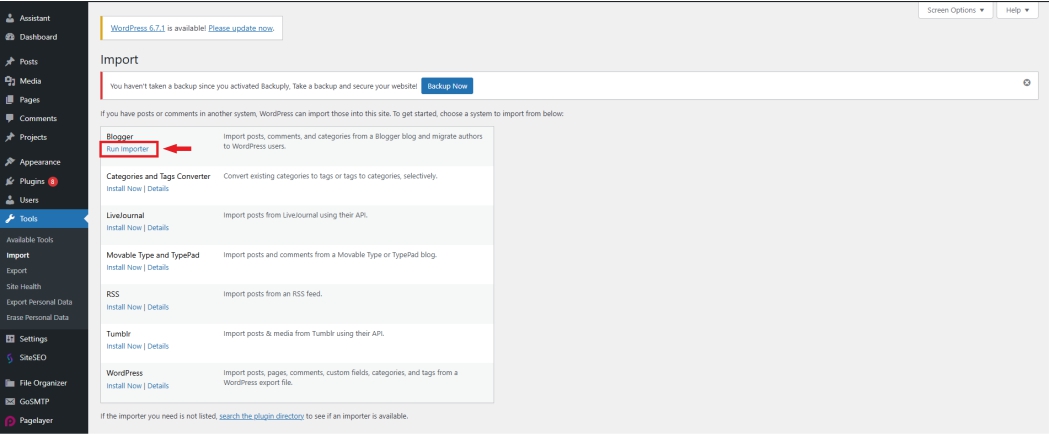
Go to Tools > Import on the WordPress dashboard.
Select Blogger, install the required plugin, and activate it.
Upload the Blogger XML File:
Run the importer tool.
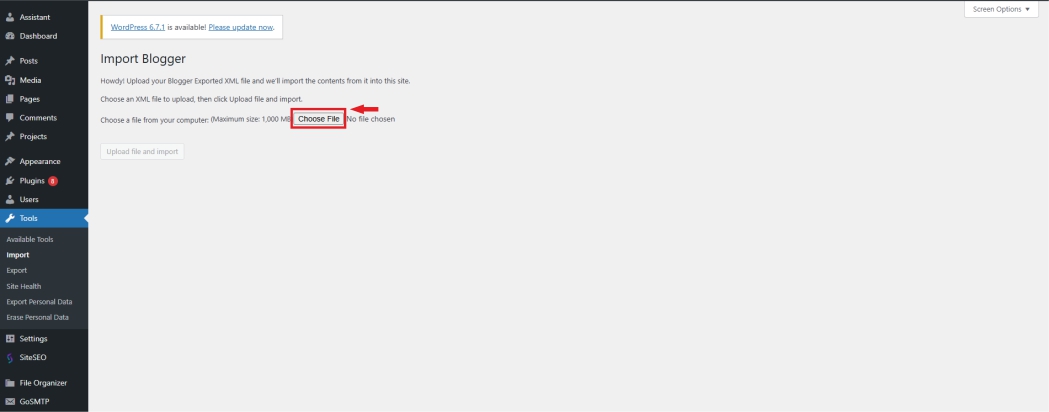
Select the .xml file you downloaded from Blogger and upload it.
Assign the posts to a WordPress author or create a new author as needed.
WordPress will now import all your Blogger posts, pages, and comments to your new site.
Conclusion:
Transferring your blog from Blogger to WordPress can feel like a daunting task, but by following these steps, you can complete the process easily and efficiently. With WordPress, you’ll enjoy greater control, customization, and features for your blog.
Many students are interested in pursuing a Master’s degree in the US. It’s a great idea because there are numerous opportunities available. However, the process to get there involves several crucial steps. These steps are important for two main reasons: they take time, and they need to be completed a certain number of days before you plan to arrive in the US. Each step is linked to the next, so they must be done in a specific sequence to ensure you meet all deadlines.
Select the US Masters Plan: Choose the date you want to land in the US. For example, if you plan to join a program starting on August 15, 2025, select this date.
Generate Your Plan: Click on “Generate Plan.” This will provide you with a timeline, detailing when you need to complete each task. For instance, you might need to start your application process on August 20, 2024, to ensure you meet all requirements and deadlines by August 15, 2025.
Follow the Timeline: The plan will list all tasks in order, ensuring you complete everything on time.
Import the dates to Google Calendar: It is a long process so there is a high chance that you will forget important milestones. This is where Google Calendar reminders will be handy.
This is an example of backward planning. There are other areas where backward planning is also beneficial. To set up your own plan, visit https://backwardplanning.fairit.in, register, and create your customized plan. This way, you won’t miss any deadlines.
3.Enter a filename to save your key in and it will create private and public keys with different extensions.
4.Type a secure passphrase when prompted. You can skip this by pressing enter but this is not the most secure way.
5.Retype passphrase when prompted (Do not forget this as it will be needed while connecting to the machine. You have to remember this paraphrase but this will be same for any machine you connect as long as you use the same ssh key pair)
6.Check if your ssh keys exist in .ssh directory
Accessing servers using SSH Keys
1.Share your public key (filename.pub) with the person who is going to grant access so he/she can add to it the authorized keys folder on the server where access is to be granted to you. Never share the private key with anyone but we suggest storing it on Google drive.
2.Connect to host: ssh -i .ssh/<private_key_filename> <user>@<host>
.
Alternatively you can add configurations to make the process quicker
Adding key configuration to config
1.Create a file in .ssh directory called config
2.Sample entry –
Host <hostname>
IdentityFile ~/.ssh/<private_key_filename>
HostName <hostname>
User <user>
3.This can also be used for GitHub SSH Keys
Host github.com-<username>
HostName github.com
User git
IdentityFile ~/.ssh/id_rsa_<username>
IdentitiesOnly yes
AddKeysToAgent yes
UseKeychain yes
.
Note: You might have to create multiple keys if you have multiple GitHub accounts.
It takes less than five minutes to Schedule Weekly Email Reports in Google Analytics per property. We do not need to manually send it to clients. Once set up, it is sent automatically. One can change frequency to daily as well.
Hello from Fair Share ID Services. Fair Share supports around 150 clients for their website maintenance. We also create Google Analytics accounts and set them up for clients’ properties, like websites. Business owners often find it complicated to navigate Google Analytics. Therefore, we provide access and default reports via email. To set this up, navigate to their property settings, go to admin, and access management. Schedule a weekly email report by filling in the necessary details and setting a 12-month duration. This process is quick and straightforward. Thank you for watching and please like and subscribe.
Understanding Traffic Sources and Tracking External Links: A Guide for WordPress Site Owners
Hello, and welcome to this video where we’ll demystify two critical aspects of managing a WordPress website. Our focus today is on Fair Share Tech, and we’ll explore the origins of its web traffic and how to effectively track clicks on external links. Let’s dive in.
You may read this blog for the steps in textual form or watch the video provided at the end of the blog.
Where did website traffic come from?
— answer to this question help us understand where to focus our limited marketing resources.
How much traffic we generated from external sites?
— answer to this question help us understand which external party are we helping and ensure we are getting fair deal for referring potential customers
Deciphering Traffic Origins with Google Analytics
First up, where does Fair Share Tech’s traffic originate? Is it through search engines, or do other websites refer visitors by featuring external links to fairshare.tech? The answer lies within the powerful tool that is Google Analytics.
Setting up Google Analytics 4 (GA4) on your site is straightforward. Once active, it begins the essential task of data collection. After giving it some time to accumulate data, your next stop is the ‘Acquisition’ section. Here, you’ll find insights under ‘Traffic Acquisition.’ This report breaks down the traffic into categories like referral, direct, and organic search, providing a broad understanding of your traffic sources.
However, to pinpoint exactly which websites are referring traffic to fairshare.tech, delve into the details by selecting ‘Source/Medium’ from the dropdown menu. This action reveals the actual websites directing visitors to your site. A treasure trove of data awaits as you navigate through the pages, uncovering all referring sites to Fair Share Tech.
Tracking Outbound Clicks: A WordPress Solution
Now, onto our second query: How do we track the number of times fairshare.tech refers visitors to external sites? WordPress site owners have an array of tools at their disposal, but for simplicity and efficiency, installing a specific plugin, such as “Track The Click,” comes highly recommended.
Once installed, allow some time for the plugin to gather data. It then presents a straightforward report showing the frequency of outbound clicks from your site. For instance, if Fair Share Tech links to validate.com, the plugin will display the total clicks this link has received.
To illustrate, let’s conduct a live test. Visiting Fair Share Tech, I click on a blog post that links to https://validat.in/. Returning to the plugin’s report and refreshing the page reveals an updated click count, confirming the tracking is working perfectly.
In conclusion, we’ve answered two pivotal questions: identifying the sources of incoming traffic and monitoring the success of outbound links. These insights are invaluable for any website owner looking to understand their audience better and refine their content strategy.
Thank you for joining me on this exploratory journey. Stay tuned for more tips on maximizing your website’s potential.
We are thrilled to announce a significant milestone in our journey to revolutionize the way authors / publishers distribute their books. As of now, three esteemed authors / publishers have chosen to partner with us, offering their valuable books for rent on DriveLMS.com. Explore their collections today:
At DriveLMS.com, our commitment is to provide a platform that benefits both authors / publishers and readers without the burden of upfront costs or recurring subscription fees. Here’s how we make a difference:
Zero Setup Fees & Subscription Charges: Our partnership model is designed to ensure that your costs are directly tied to your success. We only earn when you earn, creating a mutually beneficial ecosystem.
Performance-Based Charges: Embrace the freedom of earning with us without any upfront investment. Our transparent billing is solely based on the performance of your rented books.
Flexible Reading Periods: Tailor the rental duration to fit your strategy and your readers’ preferences. While we typically recommend a 1-year period, the choice ultimately rests with you.
Simple Requirements: To get started, all we need is your book in a standard PDF format. It’s that easy!
Human Support: You will get support from Fair Share IT Services. Just click on the WhatsApp button and get in touch with us.
Join Us Today
Leverage our innovative platform to expand your reach and connect with more readers than ever before. DriveLMS.com is not just a service; it’s a partnership where your success is our success. Please click on the below link to connect with us via WhatsApp (please mention your name and your interest in selling an e-book):