How to enable social icons in Divi theme

How to enable social icons in Divi theme

Steps on How to Install Font Awesome plugin on WordPress websites.

Step 1: Install Font Awesome plugin by searching for author font awesome

How to enable social icons in Divi theme

Step 2: Activate the above plugin

Step 3: Then search Social Divi plugin.

Screenshot of Social Divi Plugin - This plugin adds the ability to add more social icons to your website when using the Divi theme (Plugin developed by Jelle Roorda)

Step 4: Activate the above plugin

Step 5: Go to Divi → Theme Option → General tab, Make sure to disable social links from this tab. These are default ones and not all that we need.

Screenshot showing Divi Theme Options and several tabs under it with General tab highlighted

Step 6: Go to the Social Icons tab and fill the required information.

Once you have completed these steps, the social icons will be displayed on your website. They will typically appear in the header, footer, or any other designated area based on the Divi theme’s layout settings.

The exact steps may vary slightly depending on the version of the Divi theme you are using. However, the general process of enabling and configuring social icons should be similar.

Make sure to update the social media URLs with the appropriate links to your social media profiles. This way, visitors to your website will be able to click on the icons and navigate to your social media pages. With this method, even someone with basic knowledge of maintaining a WordPress site as an admin should be able to add and manage social icons in the Divi theme easily.

Sign contracts online in a few clicks

Sign contracts online in a few clicks

The quickest way to get Non-Disclosure Agreements and other agreements signed to keep your trade secrets safe. Get NDAs signed; store and manage all contracts in one place.

Sign contracts online in a few clicks.

Open https://nda.fairshare.tech/

For companies

1) Click on “Manage my organization’s NDAs contracts”, signin using mobile number and OTP
2) Manage your profile
3) Add signee’s mobile number and NDA start date
4) Inform signee to sign NDA on https://nda.fairshare.tech/

For signee

1) Click on “Sign an NDA”
2) Login using mobile number and OTP
3) Manage your profile
4) Click on pending NDA
5) Read NDA document
6) Click on ready to sign
7) Draw sign in the box
8) Click Sign NDA
9) Inform company that NDA is signed

Watch this video to learn more on Non-Disclosure Agreement (NDA) Signed in 5 Minutes


WordPress and RazorPay

WordPress and RazorPay

Do not pay attention to format of this page. Product images etc will be shown here. The purpose of this page is just to show you how the payment flow will work from product cards shown here.

Buy Fan 1:


Buy Fan 2:


Buy Fancy Lights:


Embed a video from Google Drive

Embed a video from Google Drive

Here is an example:

Here are the steps involved.

  1. Make sure that the video is shared as “Anyone with the link” can view
  2. Copy code using embed item (3 dots menu from the file’s Google Drive)
  3. Paste that code using the text mode in WordPress
  4. That’s all
Auto Respond to Just Dial Leads

Auto Respond to Just Dial Leads

If you know any Just Dial vendor that wants to increase chances of converting a lead to real customers, refer to Fair Share IT Services. Read a small story for further details:

Let’s say I want to visit a museum over a weekend. I visited Just Dial and searched and enquired about the mini railway museum. Just Dial sends an email notification to Shri Ravi Joshi (vendor) with my phone number (in this case I am the lead). 

It is hard for Shri Ravi Joshi sir to contact every lead. This might result in losing that potential customer. We call it lead leakage. 

Earlier Just Dial used to send sms to vendors. Rahul had built an Android app to intercept and send sms to the lead. 

Now that Just Dial is sending email, we have built a system that processes Just Dial lead alert emails, take out lead phone numbers from that and send sms to the lead with additional information about Mini Railways. 

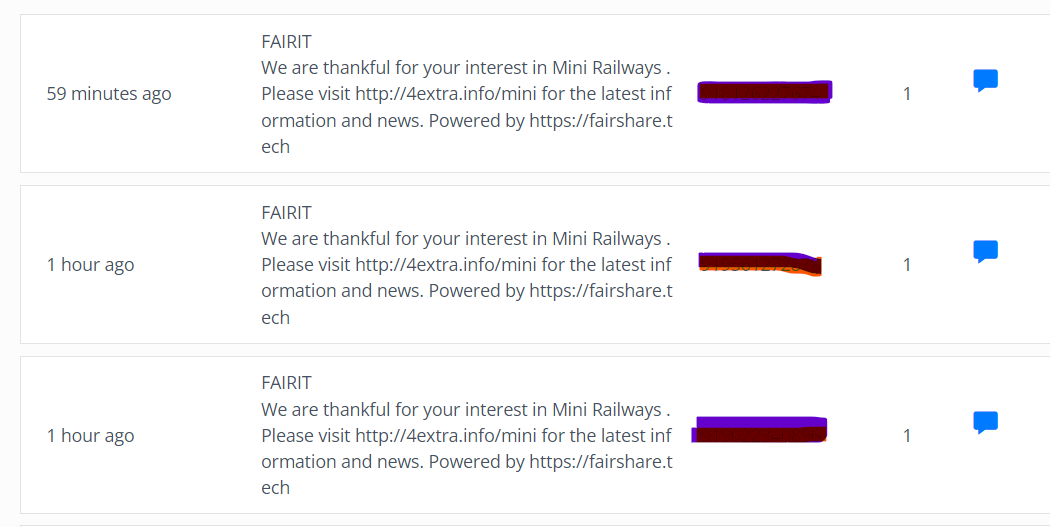
This is how those sms look like in our internal dashboard. 

The 4extra.info is a url shortener to ensure sms is not rejected for length and also for the cost savings. The second link is mandatory per TRAI rules since our system is sending the SMS and must disclose it. 

Nice and clean right? Don’t limit yourself to only Just Dial. We will be handling other competitors of Just Dial as well.

Integrating WordPress Webportal and Stripe

Integrating WordPress Webportal and Stripe

Want to learn the of Integrating WordPress Webportal and Stripe? Read this blog and find out!

WordPress is a flexible Content Management System. It is easy in WordPress to create landing pages for your products and services. But if your software product is complex, then it needs to be implemented in web portal (Laravel, RubyOnRails, Django). Now, if we want our users to pay for the services, then they will need to know the process of Integrating WordPress Webportal and Stripe. Check out the flow as below:

  1. User visits your WordPress landing page (like this) via SEO or paid Adds.
  2. User pays for the services through a button on WordPress landing page. Example button is given below.
  3. Click on the button takes the user to Stripe, where the actual payment is handled.
  4. Once the user successfully pays, then the web portal (Laravel, RubyOnRails, Django) will do whatever is expected. For example: Below button will send user a thank you email.

In summary:

  1. Landing page is on fairshare.tech.
  2. Pay now button takes user to Stripe.
  3. Payment is handled by Stripe
  4. Stripe sends notification to punefree.com (Web Portal in Ruby on Rails).
  5. punefree.com sends email to user (Email is just an example, you can modify punefree.com to do whatever you want).
All search results